In this article, you’d learn how to integrate with paystack payment gateway using spring boot. If you are new to Spring Boot, I wrote about building your first application here and if this is your first time consuming an external API with Spring Boot, you can find a detailed guideline here.
Getting started
There are 3 major steps involved in the integration process for paystack payment gateway API
Authentication
Initiate Transaction
Verify Transaction
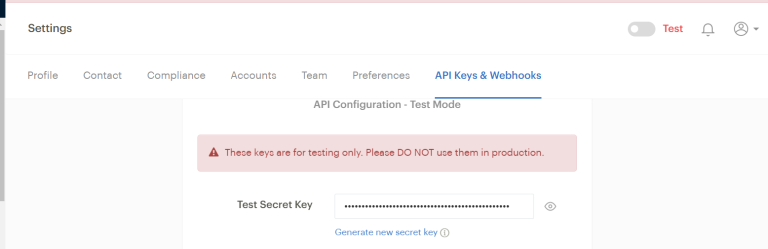
Getting SECRET Key
Every API call has to be authenticated, what this means is that when making a call to any of the API’s, you need to pass an Authorization key in your header. In this case, the key would be your secret key.
To get your secret key, you need to create an account with paystack using this link. Once your signup has been completed, login to your dashboard and navigate to settings, you should find a tab called “API Keys and Webhooks”, that’s where you can get your test key.
Paystack Test Secret Key
Initializing a transaction
Here’s the part where I integrate with an API, the initialize transaction endpoint.
Code structure
The first thing I do is to create a request DTO, this DTO would be used to map the request body to be sent to paystack’s API. For this endpoint, there are 2 compulsory fields and some optional fields but I would be working with only the compulsory fields; amount and email.
InitializeTransactionRequest
public class PaystackInitializeTransactionRequest {
public void setEmail(String email) { this.email = email; }
public String getAmount() { return amount; }
public void setAmount(String amount) { this.amount = amount; }
}
Now that I have the request structure, I’d proceed to make a call to the endpoint in my service implementation class using rest template.
I mentioned earlier that you need your secret key to make a call to any of the API’s. In the code snippet below, I pass the secret key in my header as the Authorization value as specified in the documentation.
RestTemplate restTemplate = new RestTemplate();
String secretkey = "sk_test_b2*********************";
public ResponseEntity<Object> initializeTransaction
        (PaystackInitializeTransactionRequest request) {
    String url = "https://api.paystack.co/transaction/initialize";
    HttpHeaders headers = new HttpHeaders();
    headers.set("Authorization", "Bearer " + "" + secretkey);
    HttpEntity<PaystackInitializeTransactionRequest> httpEntity = new HttpEntity<>(request, headers);
    ResponseEntity<Object> result = restTemplate.postForEntity(url, httpEntity, Object.class);
    return result;
}
Controller
The next thing is to write the controller code.
@RestController @RequestMapping("/paystack") public class PaystackController {
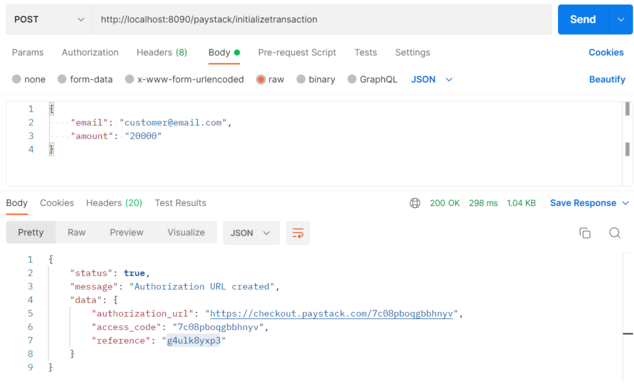
To test the integration, I used postman. There are two important fields in the response;
authorization_url: this is the url your customers would use to make payment
reference: you need to keep track of this reference because you need it when trying to verify/check the status of your transaction
Postman test response
Testing the authorization url
To test the authorization url, copy it and paste it on a browser. You would notice that the amount and email shown are the same with what you specified when making the request
Test
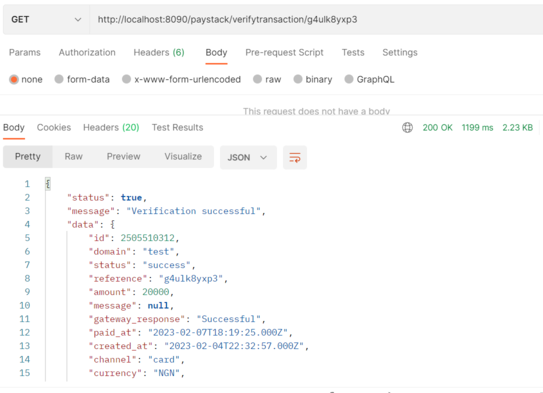
Verifying Transaction
This is the endpoint to call when you want to check the status of your transaction. This is a GET request so there is no request body, just a path variable specifying the reference of the transaction.